
Contents
Introduction
In this tutorial I’ll cover different ways you can validate your data in Laravel 4. Almost every interactive web application requires some kind of data validation. For example, if your web application have registration form, you want email field to be unique or require from users to confirm their password. Laravel already has many standard rules to use within your validator, but if you don’t find one that meets your requirements at any time you can create your own rule.
There is a many ways how you can implement validation and I think the most common and the easiest way is to validate data directly in your controller. But, before we start validating our data let’s configure database and create migration for our users table.
What we are building?
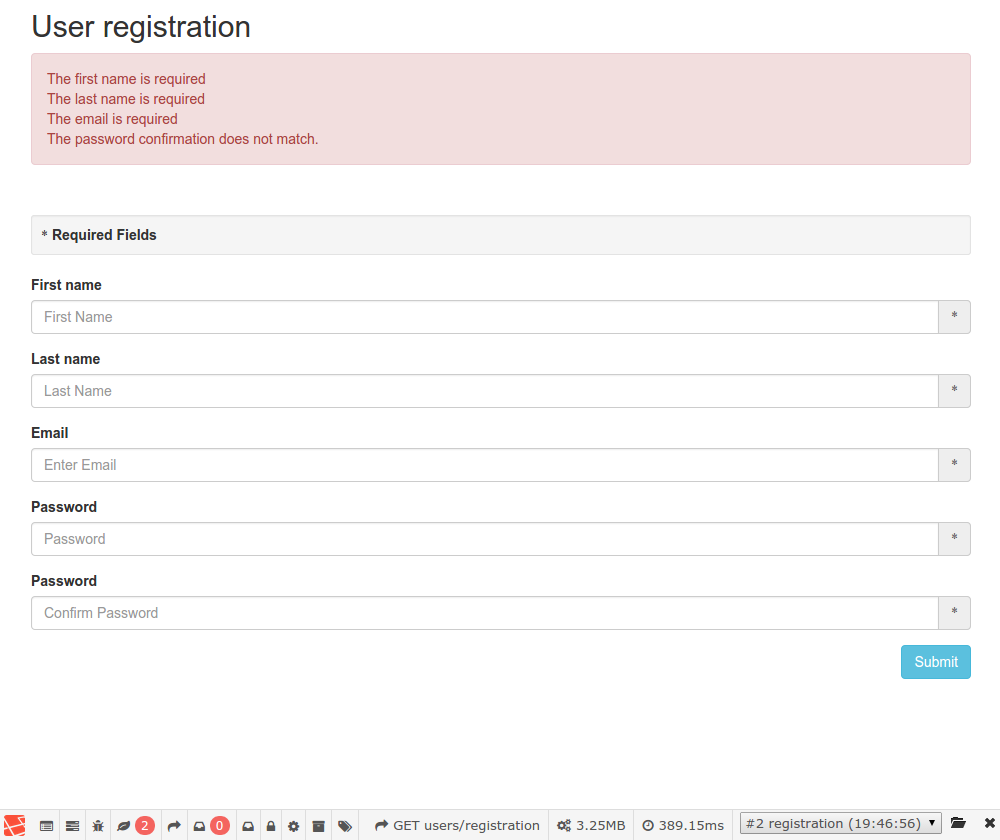
To see Laravel validation in action we will create simple user registration form. On that registration form we’ll apply the following rules:
- First name – required, alpha only, maximum 100 chars
- Last name – required, alpha only, maximum 100 chars
- Email – required, check is correct email format
- Password – required, alpha-numeric, confirmed, minimum 8 characters, must be confirmed
And here is how our simple form will look like:
Database, migrations, routing…
You need to set your database configuration in the app/config/local/database.php , I’ll use homestead’s default settings for this example:
|
1 2 3 4 5 6 7 8 9 10 |
'mysql' => array( 'driver' => 'mysql', 'host' => 'localhost', 'database' => 'homestead', 'username' => 'homestead', 'password' => 'secret', 'charset' => 'utf8', 'collation' => 'utf8_unicode_ci', 'prefix' => '' ), |
Users table will contain only four fields: first_name, last_name, email and password. To create migration run artisan migrate:make command:
|
1 |
php artisan migrate:make create_users_table --create=users |
this command will create a new migration file in the app/database/migrations folder. Open that file and change up method as follows:
|
1 2 3 4 5 6 7 8 9 10 11 12 13 14 |
public function up() { Schema::create('users', function(Blueprint $table) { $table->increments('id'); $table->string('first_name', 100); $table->string('last_name', 100); $table->string('email'); $table->string('password'); $table->timestamps(); }); } |
After you have updated migration file you need to run artisan migrate command:
|
1 |
php artisan migrate |
Result of the migrate command is:
|
1 2 |
Migration table created successfully. Migrated: 2015_01_03_082510_create_users_table |
In the next steps we will define two routes, one for get and another one for the post requests, and we’ll make basic form view for these routes.
Basic Eloquent Model
Before creating routes and views, let’s establish our User model. Model contains all Business Logic of your application, which means it describes how the application interacts with the database. Laravel comes with simple and elegant ActiveRecord implementation called Eloquent ORM which makes this interaction incredibly easy.
Here is a simple User model we’ll use for this example:
|
1 2 3 4 5 6 7 8 9 10 11 12 13 14 15 16 17 18 19 20 21 22 23 24 |
<?php class User extends Eloquent { /** * The database table used by the model. * * @var string */ protected $table = 'users'; /** * The attributes excluded from the model's JSON form. * * @var array */ protected $hidden = ['password']; /** * @var array */ protected $fillable = ['first_name', 'last_name', 'email', 'password']; } |
By default Eloquent models are protected against mass-assignments. For this reason in $fillable property we can white list attributes we want to be mass-assignable.
Setting up Routes
As I said before, we’ll need only two routes. One will handle GET requests, and another one will handle POST requests:
|
1 2 3 4 |
Route::group(['prefix' => 'users'], function() { Route::get('registration', 'RegistrationController@show'); Route::post('registration', ['before' => 'csrf', 'use' => 'RegistrationController@store']); }); |
You can access this at http://homestead.dev/users/registration. As you can see, POST request will be send to the same URL.
Now when the routes are set, let’s set up basic form view.
Create Form View
You already know that Laravel store views in app/views folder. So create new view called app/views/users/registration.blade.php :
|
1 2 3 4 5 6 7 8 9 10 11 12 13 14 15 16 17 18 19 20 21 22 23 24 25 26 27 28 29 30 31 32 33 34 35 36 37 38 39 40 41 42 43 44 45 46 47 48 49 50 51 52 53 54 55 56 57 58 59 60 61 62 63 64 65 66 67 68 69 70 |
@extends('layouts.default') @section('content') <style> form { margin-top: 50px; } </style> <div class="container"> <div class="row"> <div class="col-lg-6 col-lg-offset-3"> <h2>User registration</h2> </div> <div class="col-lg-6 col-lg-offset-3"> @if ($errors->has()) <div class="alert alert-danger"> @foreach ($errors->all() as $error) {{ $error }}<br> @endforeach </div> @endif {{ Form::open(array('url' => 'users/registration', 'method' => 'post')) }} <div class="well well-sm"><strong><span class="glyphicon glyphicon-asterisk"></span> Required Fields</strong></div> <div class="form-group"> {{ Form::label('first_name', 'First name', array('for' => 'first_name')) }} <div class="input-group"> {{ Form::text('first_name', null, ['class' => 'form-control', 'name' => 'first_name', 'placeholder' => 'First Name']) }} <span class="input-group-addon"><span class="glyphicon glyphicon-asterisk"></span></span> </div> </div> <div class="form-group"> {{ Form::label('last_name', 'Last name', array('for' => 'last_name')) }} <div class="input-group"> {{ Form::text('last_name', null, ['class' => 'form-control', 'name' => 'last_name', 'placeholder' => 'Last Name']) }} <span class="input-group-addon"><span class="glyphicon glyphicon-asterisk"></span></span> </div> </div> <div class="form-group"> {{ Form::label('email', 'Email', array('for' => 'email')) }} <div class="input-group"> {{ Form::email('email', null, ['class' => 'form-control', 'name' => 'email', 'placeholder' => 'Enter Email']) }} <span class="input-group-addon"><span class="glyphicon glyphicon-asterisk"></span></span> </div> </div> <div class="form-group"> {{ Form::label('password', 'Password', array('for' => 'password')) }} <div class="input-group"> {{ Form::password('password', ['name' => 'password', 'class' => 'form-control', 'placeholder' => 'Password']) }} <span class="input-group-addon"><span class="glyphicon glyphicon-asterisk"></span></span> </div> </div> <div class="form-group"> {{ Form::label('password_confirm', 'Password', array('for' => 'password_confirm')) }} <div class="input-group"> {{ Form::password('password_confirm', ['name' => 'password_confirm', 'class' => 'form-control', 'placeholder' => 'Confirm Password']) }} <span class="input-group-addon"><span class="glyphicon glyphicon-asterisk"></span></span> </div> </div> <input type="submit" name="submit" id="submit" value="Submit" class="btn btn-info pull-right"> {{ Form::close() }} </div> </div> </div> @stop |
I’ll assume that you already have some basic understanding of the Blade templating engine. You also need to create default layout; just paste this code in app/views/layouts/default.blade.php :
|
1 2 3 4 5 6 7 8 9 10 11 12 13 14 15 16 17 18 19 20 21 22 23 24 25 |
<!DOCTYPE html> <html lang="en"> <head> <meta charset="utf-8" /> <title>User registration</title> <link href="/favicon.ico" rel="shortcut icon" type="image/x-icon" /> <meta name="viewport" content="width=device-width, initial-scale=1.0" /> <meta name="description" content="Some description" /> <link rel="stylesheet" type="text/css" href="/assets/css/bootstrap.min.css" /> <link rel="stylesheet" type="text/css" href="/assets/fonts/font-awesome/css/font-awesome.min.css" /> <link rel="stylesheet" type="text/css" href="/assets/css/main.css" /> <script type="text/javascript" src="/assets/js/jquery-1.11.2.min.js"></script> <script type="text/javascript" src="/assets/js/bootstrap.min.js"></script> </head> <body> @yield('content') </body> </html> |
After creating our model, setting up routes and basic view, we can switch our focus to the main topic of this article – validation.
Validation
Laravel provides a great validation system, full of functionalities intended to help you validate your data. The Validator class is responsible for all of that. Simplest way to use Validator class is by calling Validator::make() method. This method has four arguments. The first argument is an array of data to validate, second is an array of rules, third argument is an array of validation messages and fourth argument is an array of custom attributes.
The Validator class also has some useful methods you can use. I’ll mention some of them:
- mergeRules(string $attribute, string|array $rules) – allows you to merge additional rules into a given attribute
- passes() – tells us whether the posted data is valid
- fails() – tells us whether the posted data is not valid
- valid() – returns the data which was valid.
- invalid() – returns the data which was invalid.
- messages() – returns message container for the validator
- errors() – an alternative more semantic shortcut to the message container.
To see other functionalities of this class you should visit the API documentation page.
Controller level validation
Almost every book I read about Laravel development covers this type of validation. Because it’s fairly easy to implement it’s preferable for small applications. But for larger applications I recommend putting validation logic outside the controller.
Here is an basic example of data validation:
|
1 2 3 4 5 6 7 8 9 10 11 12 13 14 15 16 17 18 19 20 21 22 23 24 25 26 27 28 |
public function store() { $input = [ 'first_name' => Input::get('first_name'), 'last_name' => Input::get('last_name'), 'email' => Input::get('email'), 'password' => Hash::make(Input::get('password')), 'password_confirm' => Hash::make(Input::get('password')) ]; $rules = [ 'first_name' => 'required|alpha|max:100', 'last_name' => 'required|alpha|max:100', 'email' => 'required|email', 'password' => 'required|min:8|confirmed' ]; $validation = Validator::make($input, $rules); if($validation->passes()) { User::create($input); return Redirect::to('users/registration'); } else { $errors = $validation->errors(); return Redirect::to('users/registration')->withErrors($errors); } } |
The first argument we passed to the make method represent data under validation. The second argument are the validation rules we want to apply to the data.
If you want to provide custom messages, just pass them as third argument of the make method, like this:
|
1 2 3 4 5 6 7 8 9 10 11 |
$messages = [ 'first_name.required' => 'The :attribute is required', 'first_name.alpha' => 'The :attribute may only contain letters', 'first_name.max' => 'The :attribute may contain max :max letters', 'last_name.required' => 'The :attribute is required', 'last_name.alpha' => 'The :attribute may only contain letters', 'last_name.max' => 'The :attribute may contain max :max letters', 'email.required' => 'The :attribute is required' ]; $validation = Validator::make($input, $rules, $messages); |
By default Laravel will take attributes from data array you provided. As I have already mentioned, make method have four parameters. The fourth parameter is used to customize attribute display in validation messages. This is very useful when you want to localize your application. To take an advantage of this feature let’s see how localized application would look like. First you need to modify $messages array to get localized messages:
|
1 2 3 4 5 6 7 8 9 10 11 12 |
$messages = [ 'first_name.required' => Lang::get('users.validation.first_name.required'), 'first_name.alpha' => Lang::get('users.validation.first_name.alpha'), 'first_name.max' => Lang::get('users.validation.first_name.max'), 'last_name.required' => Lang::get('users.validation.last_name.required'), 'last_name.alpha' => Lang::get('users.validation.last_name.alpha'), 'last_name.max' => Lang::get('users.validation.last_name.max'), 'email.required' => Lang::get('users.validation.email.required'), 'password.required' => Lang::get('users.validation.password.required'), 'password.min' => Lang::get('users.validation.password.min'), 'password.confirmed' => Lang::get('users.validation.password.confirmed') ]; |
next, create an language file for the registration form app/lang/{locale}/registration.php , in this case I’ll put Bosnian localization in app/lang/bs/registration.php :
|
1 2 3 4 5 6 7 8 9 10 11 12 |
return [ 'first_name.required' => 'Polje :attribute je obavezno', 'first_name.alpha' => 'Polje :attribute moze sadrzavati samo slova', 'first_name.max' => 'Polje :attribute moze sadrzavati :max slova', 'last_name.required' => 'Polje :attribute je obavezno', 'last_name.alpha' => 'Polje :attribute moze sadrzavati samo slova', 'last_name.max' => 'Polje :attribute moze sadrzavati :max slova', 'email.required' => 'Polje :attribute je obavezno', 'password.required' => 'Polje :attribute je obavezno', 'password.min' => 'Polje :attribute moze imati minimalno :min karaktera', 'password.confirmed' => 'Morate potvrditi unos za polje :attribute' ]; |
And we need to update our store method a little bit:
|
1 2 3 4 5 6 7 8 9 10 11 12 13 14 15 16 17 18 19 20 21 22 23 24 25 26 27 28 29 30 31 32 33 34 35 36 37 38 39 40 41 |
public function store() { $input = [ 'first_name' => Input::get('first_name'), 'last_name' => Input::get('last_name'), 'email' => Input::get('email'), 'password' => Hash::make(Input::get('password')), 'password_confirm' => Hash::make(Input::get('password')) ]; $rules = [ 'first_name' => 'required|alpha|max:100', 'last_name' => 'required|alpha|max:100', 'email' => 'required|email', 'password' => 'required|min:8|confirmed' ]; $messages = [ 'first_name.required' => Lang::get('registration.first_name.required'), 'first_name.alpha' => Lang::get('registration.first_name.alpha'), 'first_name.max' => Lang::get('registration.first_name.max'), 'last_name.required' => Lang::get('registration.last_name.required'), 'last_name.alpha' => Lang::get('registration.last_name.alpha'), 'last_name.max' => Lang::get('registration.last_name.max'), 'email.required' => Lang::get('registration.email.required'), 'password.required' => Lang::get('registration.password.required'), 'password.min' => Lang::get('registration.password.min'), 'password.confirmed' => Lang::get('registration.password.confirmed') ]; $validation = Validator::make($input, $rules, $messages); if($validation->passes()) { User::create($input); return Redirect::to('users/registration'); } else { $errors = $validation->errors(); return Redirect::to('users/registration')->withErrors($errors); } } |
As you might guess, if you try to submit the form everything will work fine, same as before. The only difference is that we get localized version of the error messages:
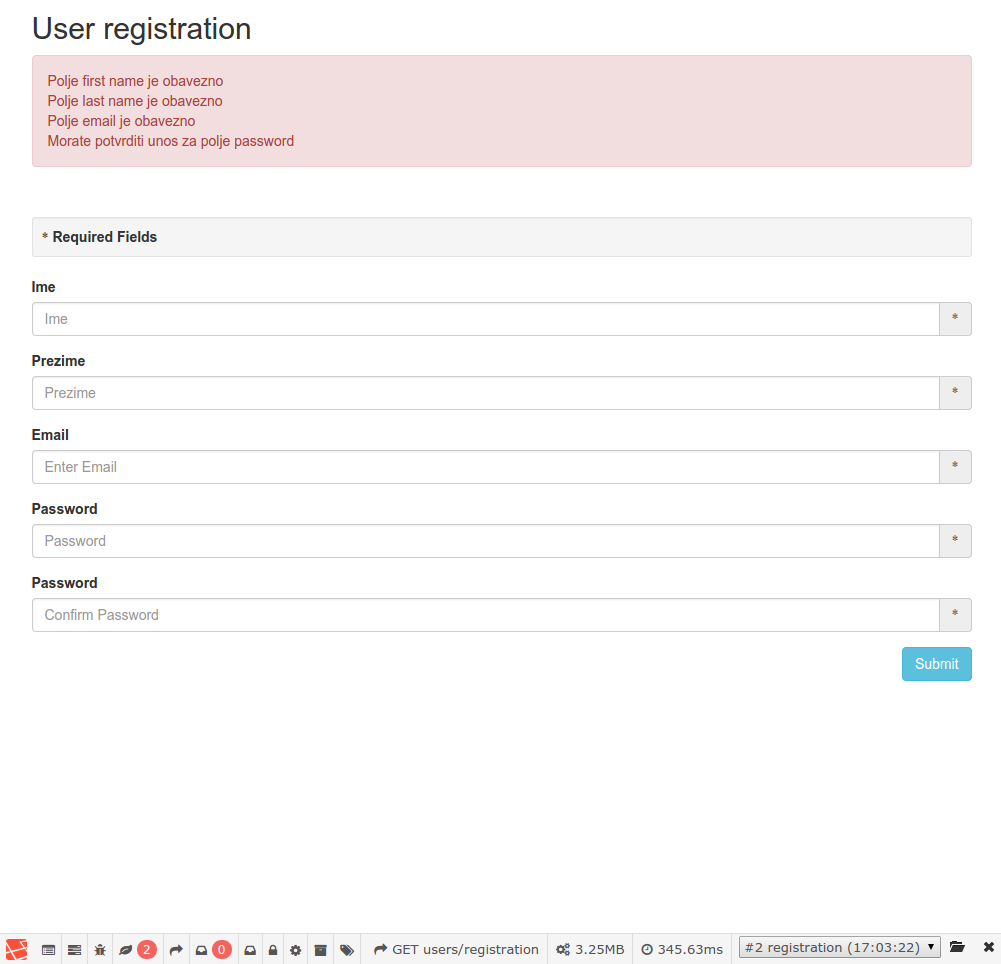
Can you see the problem in the image above? Laravel didn’t translate attribute fields, because we haven’t specify them anywhere. Fortunately, we have a possibility to set custom attributes by providing the fourth argument to the make method:
|
1 2 3 4 5 6 7 8 |
$attributes = [ 'first_name' => Lang::get('attributes.first_name'), 'last_name' => Lang::get('attributes.last_name'), 'email' => Lang::get('attributes.email'), 'password' => Lang::get('attributes.password') ]; $validation = Validator::make($input, $rules, $messages, $attributes); |
Don’t forget to create app/lang/{locale}/attributes.php :
|
1 2 3 4 5 6 7 |
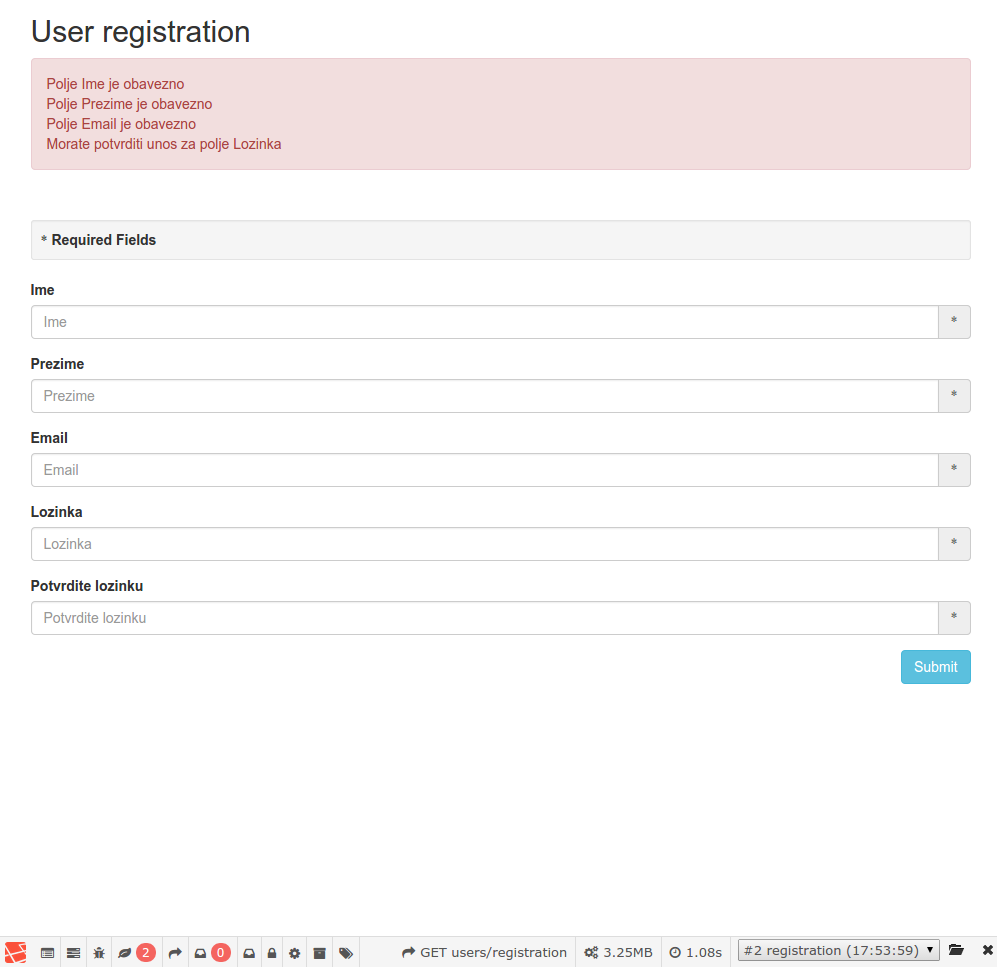
return [ 'first_name' => 'Ime', 'last_name' => 'Prezime', 'email' => 'Email', 'password' => 'Lozinka', 'confirm_password' => 'Potvrdite lozinku' ]; |
Now when you try to submit the form you should have localized error messages as well as attributes:
Another way to set custom attributes is by using setAttributeNames method on a Validator instance:
|
1 2 3 4 5 6 7 8 9 10 |
$attributes = [ 'first_name' => Lang::get('attributes.first_name'), 'last_name' => Lang::get('attributes.last_name'), 'email' => Lang::get('attributes.email'), 'password' => Lang::get('attributes.password') ]; $validation = Validator::make($input, $rules, $messages); $validation->setAttributeNames($attributes); |
And that’s it. Now you know how you can perform simple validation, localize your error messages and set custom attributes. In the next article, I’ll cover model and service level data validation.
If you have any comments or suggestion how to improve this article, feel free to leave a comment below.
Latest posts by Mirza Pasic (see all)
- Quick tip: How to delete a tag from a Git repository? - August 20, 2016
- Laravel Accessors and Mutators - December 17, 2015
- How to allow remote connections to PostgreSQL database server - December 15, 2015